How We Built A 5500 Sft Custom Home In North Vancouver In Less Than 12 Months

Facebook
Pinterest
Email
WhatsApp

How do you build a home, and where do you even start? These are probably the first two questions you will ask when thinking of building a house. I will explain our building process and how we successfully build several quality homes over 5000 square feet in North Vancouver.

Contents

Purchase The Land

First things first, you will need to have land to build your new home. Where you purchase the land and the type of Zoning for that specific area makes a massive difference in the size and type of house built on this lot. 

Our Marigold project is located in The District Of North Vancouver and falls under the RS3 Zoning. Therefore, it’s essential to know a few things before a lot is purchased; this can include the size of the lot, the Zoning, which outlines setbacks, height restrictions, the size of the home and much more. This information can be found online if you are interested in doing the research and spending the time. However, hiring an Architect, Home Designer, or a Design/Build team will be much more beneficial due to the complexity of this matter. Not only does the size and the Zoning make a difference in the type of structure built on this land, but the location plays a huge role as well. 

If the lot is flat, you don’t have to spend your budget on retaining walls, and this also eliminates the number of steps to get to your front door, which is more desirable.

Architectural House Plans, Consultants & Building Permit

Once the land has been selected, the next step would be to hire a Designer/Architect and order a Land Survey. We typically utilize the tools online to get the dimensions and contours to start our initial sketches and brainstorming while the survey is prepared. The survey could take 3-4 weeks or longer, depending on the survey company’s workload to prepare the survey. 

Next, a building permit must be obtained depending on the municipality, and specific consultants should be hired for each task. The consultants that could be employed for your project are a Geotechnical Engineer, Structural Engineer, Energy Advisor, Building Envelope Consultant, and Tree Arborist. 

Once the documents are completed, you will apply for a building permit and pay the application fee for the Building Permit. There are a few engineering fees to be paid for and deposits when building a new home, so that it would be wise to budget for these costs. When applying for a Building Permit, you will also need to apply for a Demolition Permit to demolish the existing structure on the lot. Finally, before the Building Permit is issued, your Home Builder will need to register the new home through BC Housing.

Pre-Construction

There are few critical tasks before construction begins, and it is crucial to review these items to ensure a smooth, successful project. 

  • Review the Architectural & Structural plans. Check the elevations, dimensions, ceiling heights, window & door sizes so that everything makes sense before you start construction because making changes on site could cost time and money. 
  • Review the interior design drawings if available. 
  • Send the drawings to your local lumber supplier for a lumber package and roof truss package.
  • Select a window company for your project. 
  • Get prices for materials/trades and complete a budget for your project. Make sure you have a contingency in your budget. 
  • It’s essential to put together a schedule for your project before starting construction and following this schedule as best as possible. We understand that delays can happen and that the schedule will have to be updated as the project progresses. 
  • After the City has capped the water service and given you a new water service, hire a plumber to provide you with temporary water service and perhaps a water station for the workers to wash their hands (they will thank you for this). 
  • Check the existing home for asbestos and safely remove this material and any drywall before the house gets demolished. 
  • Set up a site fence and order a portable washroom for the building site.
  • Hire an electrician to set up temporary power for the site.
  • Optional: Set up security cameras on the temporary electrical pole to monitor your site.
  • Notify the neighbours that you are starting construction. 

Construction Begins

Once you have completed all the steps above and have your Building Permit in hand, you first want to demolish the existing structure and start excavating.

Demolition & Excavation

Play Video about Demolition & Excavation

It’s essential to have the survey company on site after the land has been cleared to lay out the rough excavation points so that you’re not digging the wrong location or digging too much. After the excavation is complete, you will need to place gravel in the foundation as per the details on the plan and compact the gravel to ensure a good subgrade for the footings.

Demolition & Excavation

Forming & Framing

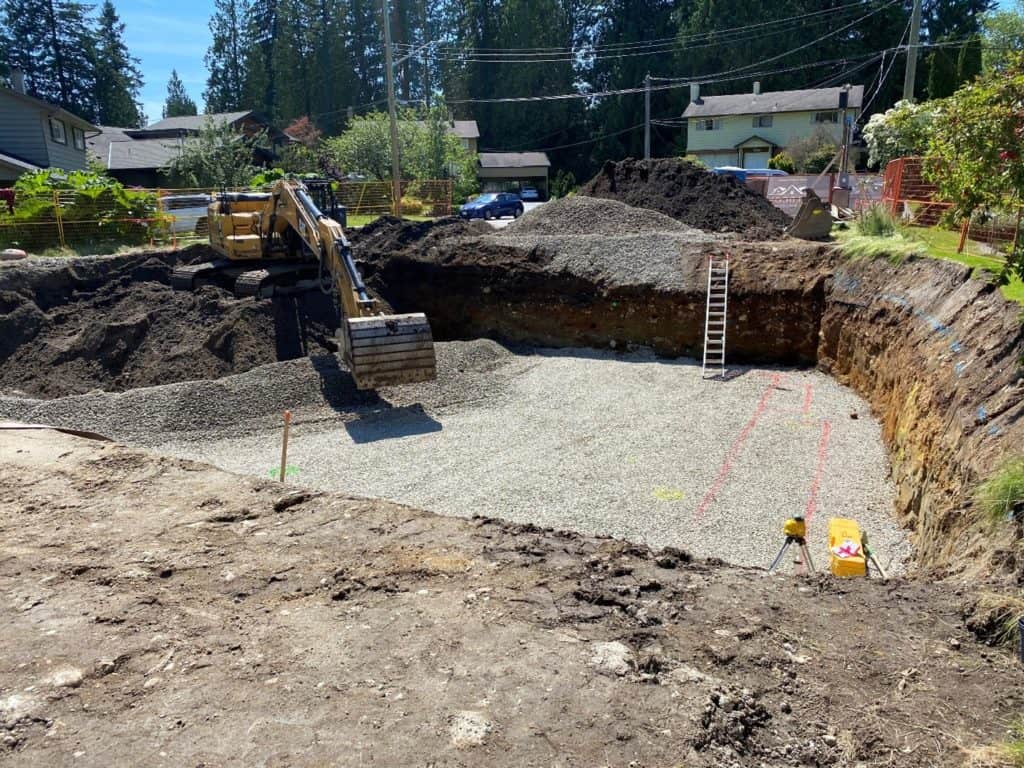
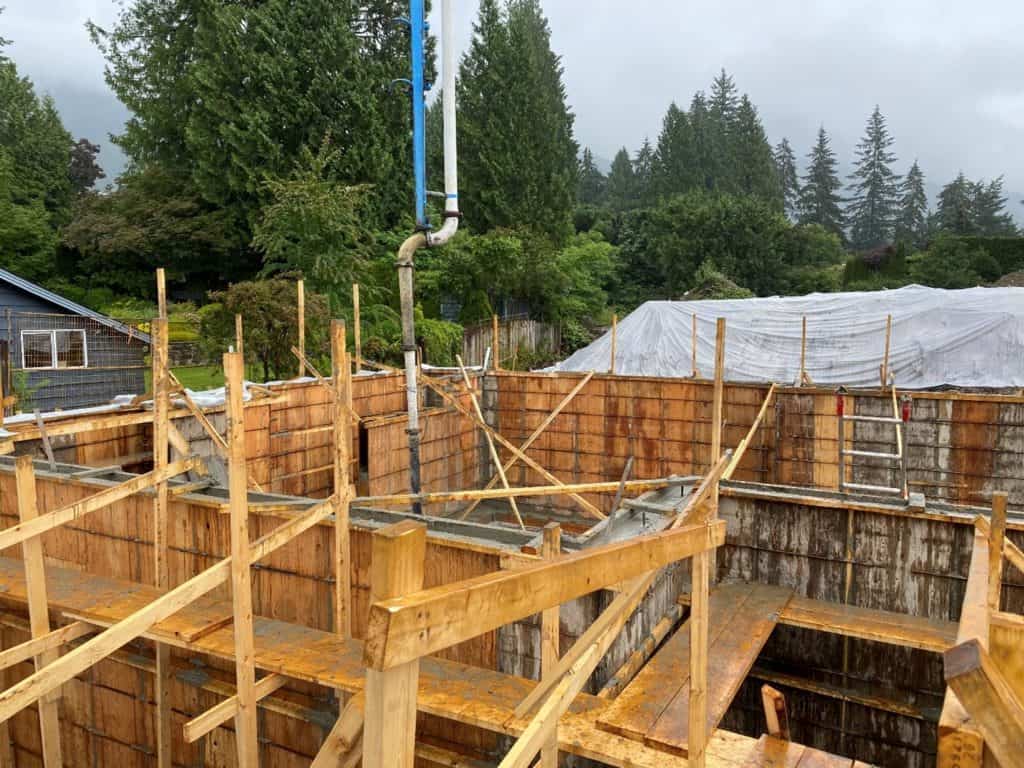
Start Forming the footings and possibly the foundation walls as well. We typically pour the footings and walls at once; however, it’s best to pour the footings first and then the foundation walls after if you’re building a more complex or more extensive home.

It’s essential to meet with the plumbers and electricians to see if they need to run their lines through the footings/slab. After that, all the primary services will need to get into the foundation. If you plan correctly before pouring concrete, you will save yourself from cutting into the concrete and jackhammering concrete to get your services in later.

The forms should be complete by now, and it’s time to place rebar in the forms. There will be a couple of inspections before placing concrete in the forms, one will be by the Structural Engineer, and the second will be a city inspection. At this point, you will also require a survey form certificate to ensure the location of the forms is correct and the pour strip elevations.
Once the inspections are passed, it’s time to pour concrete, and at this time, you will start to see your new home come to life.

Forming & Framing

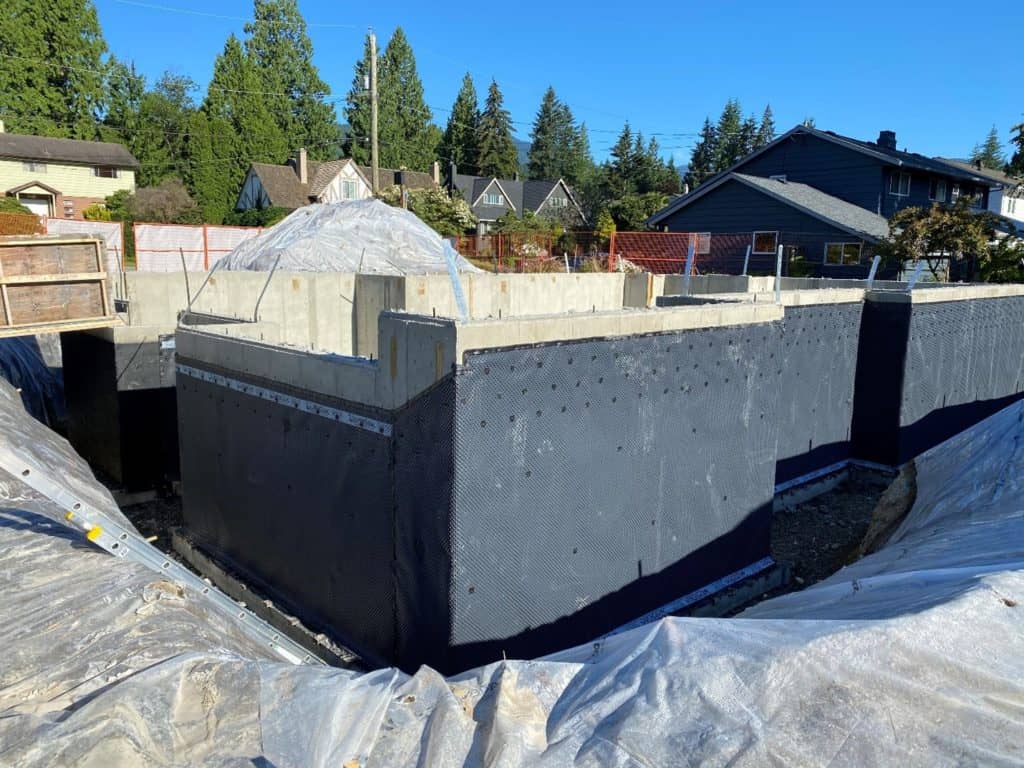
After the concrete has been poured, the forms will be stripped, and the foundation should be clear from any construction material and waste. Next, we will place a few loads of gravel in the foundation to the appropriate required elevation and level out the gravel to have a flat working surface.

We will inspect the concrete to ensure it has been placed correctly and apply waterproofing or damp proofing for the outside of the foundation. For our Marigold project, we installed spray-on waterproofing on the foundation walls by SuperPro Coatings, followed by a dimpled membrane by SUPERSEAL.

Drainage & Site Services

How We Built A 5500 Sft Custom Home In North Vancouver In Less Than 12 Months 1

Your building envelope consultant will want to see the waterproofing after installation and issue a field review memo. The building inspector will also want to see this work complete before backfill. We schedule a site visit with our home warranty provider to document the progress up to this point.

Now it’s time to bring the water service and electrical into the foundation and the sanitary out of it before placing drainage and backfill. Next, depending on the schedule, we either continue with the exterior site works or build the basement walls and complete the main floor package.

Our lumber package has been ordered and will be delivered into the foundation ready for the Framers. Remember, if there are any specialty hardware/beams or any steel posts and beams, order them well ahead of time, as these can take longer to make than regular dimensional lumber.

CRANE DELIVERING LUMBER INTO FOUNDATION

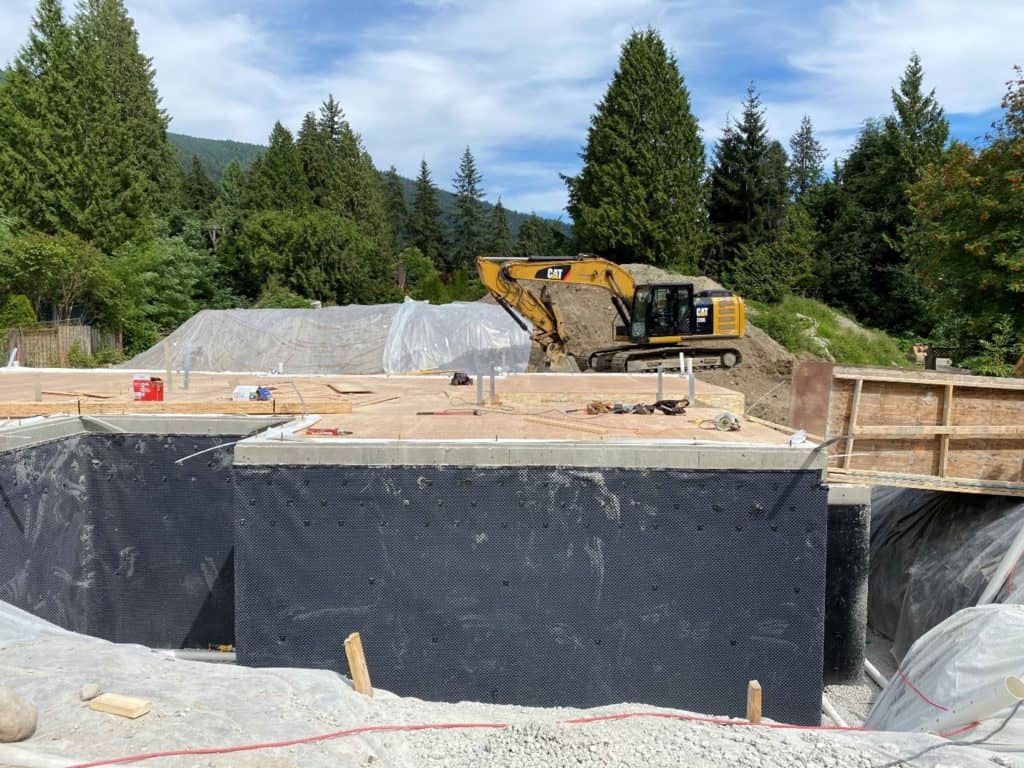
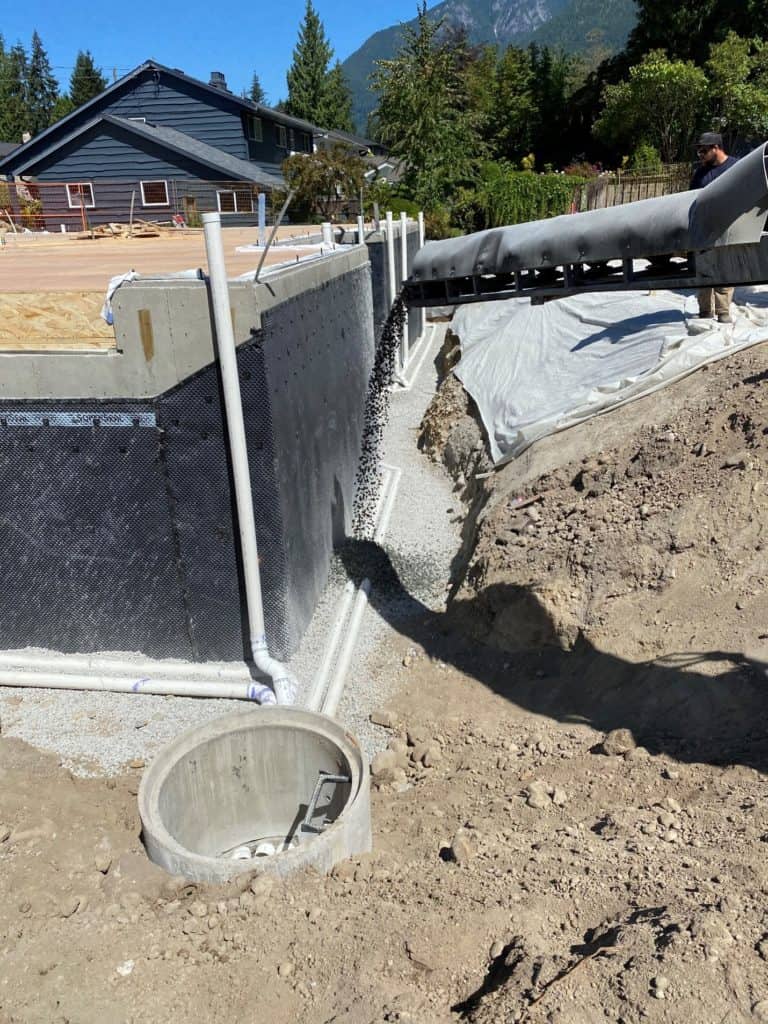
The Lower Floor framing is complete, and now it’s time to finish the drainage around the building, followed by more gravel and backfill.

more gravel and backfill

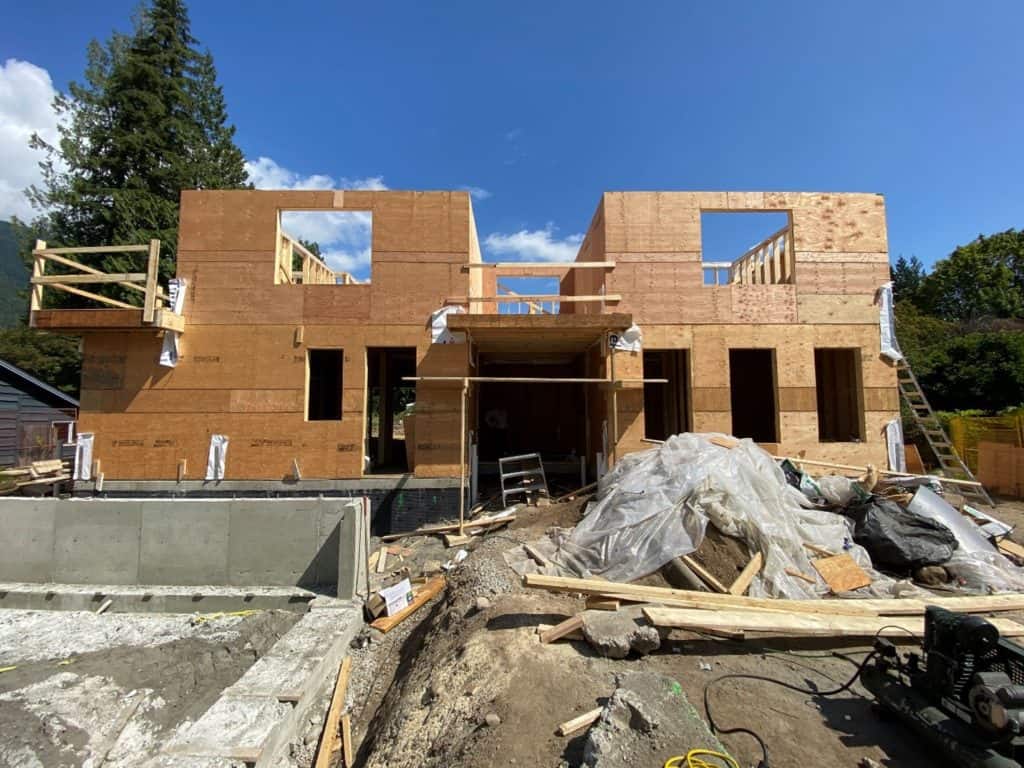
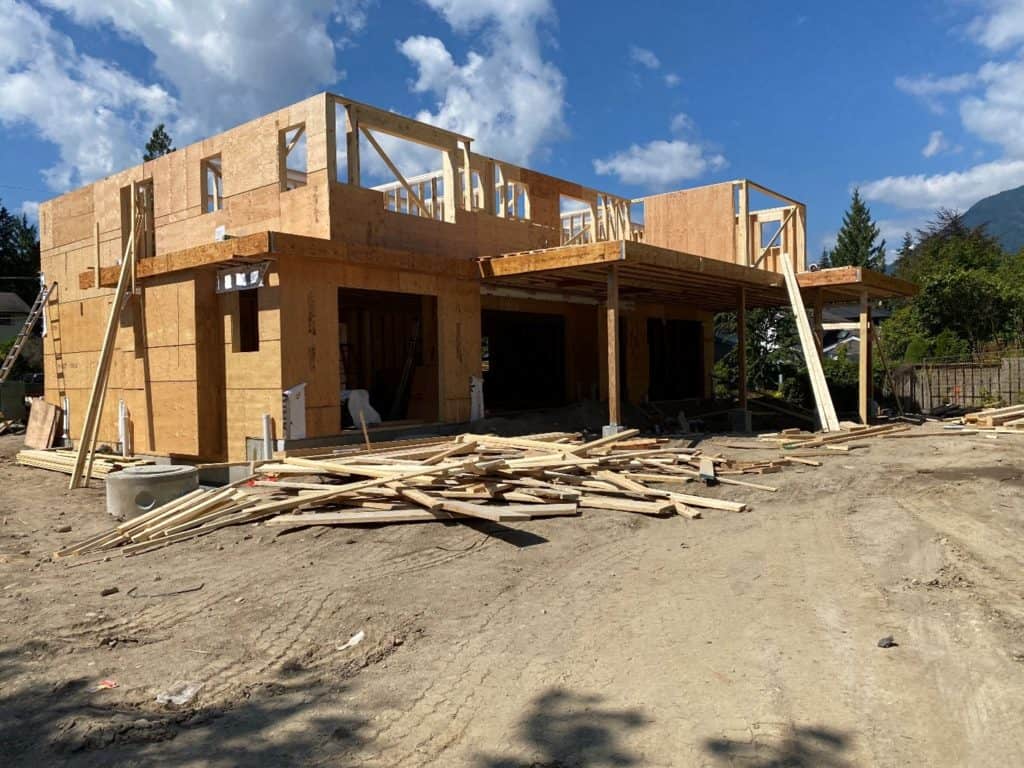
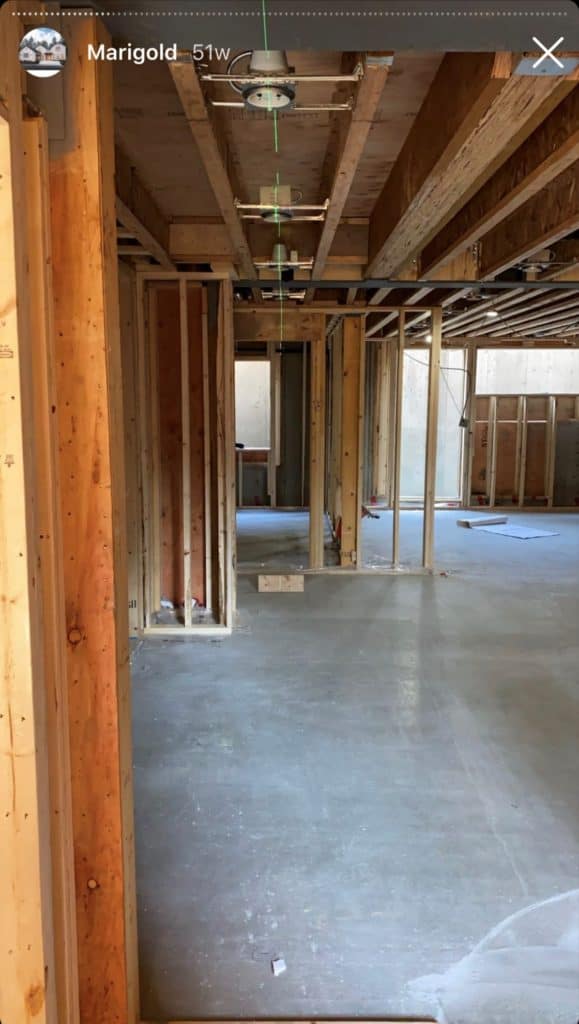
Framing has officially started at this point. Since we already framed the basement up to the main floor, we are ahead of schedule and will begin with the main floor walls and floor joists. Next, the upper floor walls are framed, and we’re now ready to order the roof trusses. At this point, we do a final measure of the house to confirm the truss package.

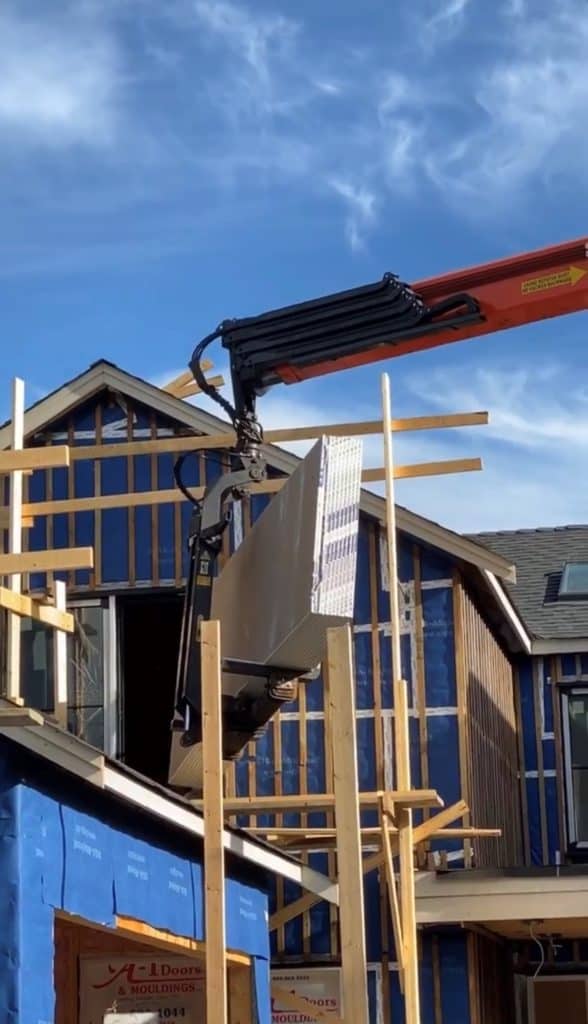
Finally, the roof package goes into production, and the framers continue working on the flat roofs and decks. Any final window/door adjustments are made now as we order the window package.

outside framing of home

outside framing of home - side view

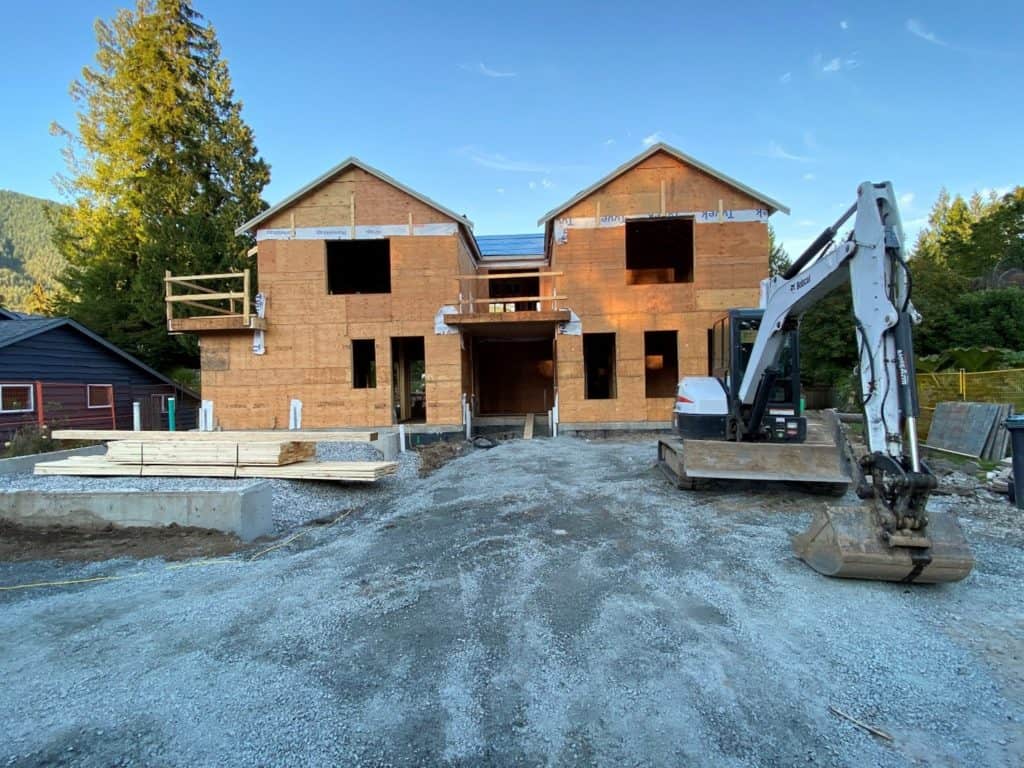
Next, the roof truss package has arrived to site and installed, followed by any skylight rough openings are completed. The plywood is installed, and the roof is inspected. The consultant, structural engineer and builder check for proper installation per the roof truss specifications with appropriate braces and nailing.

There shouldn’t be any soft spots on the roof either as this could cause problems in the future. The roofer should now apply the specified roofing membrane to the roof sheathing so that you can carry on construction without the inside of the structure getting wet from rain or snow. Here in Vancouver, we live in a climate where we’re used to the rain. However, we want to keep our buildings dry as much as possible during construction.

completed roof truss

Rough-in Plumbing

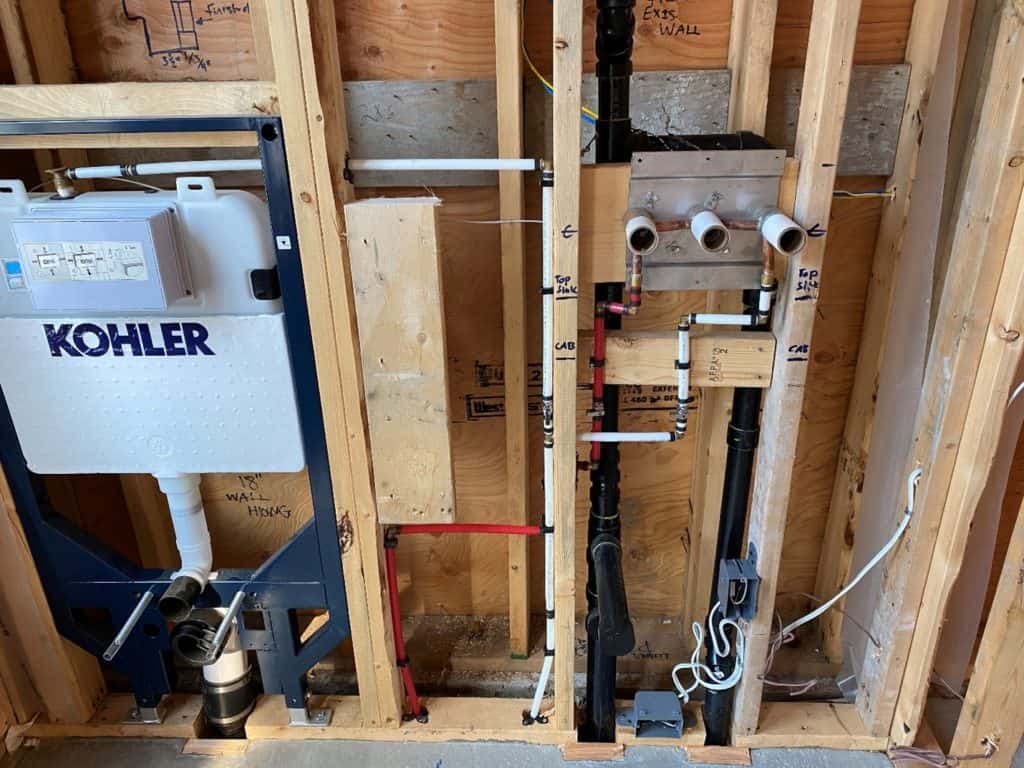
Next, we’re ready for the rough-in plumbing DWV (Drain, Waste & Vent). We will go over the house specifications and mark out the locations for each home component, such as shower/bathtub locations, mechanical equipment and locations, kitchen fridge, dishwasher, bar fridge, wine cellar locations.

Before starting any plumbing work, anything crucial should be marked on the framing and discussed with the plumbers. Remember in the pre-construction section when I mentioned reviewing the architectural, structural and interior design drawings?

For Marigold, we wanted to achieve flat ceilings with no drops. Typically, ceiling drops are built to hide plumbing/HVAC runs that drop down from the ceiling. However, while reviewing the structural engineer drawings, we noticed several wood beams and steel beams in the basement that would interfere with the plumbing and not allow for a flat ceiling and no drops.

We set up meetings with the Mechanical contractors to discuss the plumbing and HVAC rough-in routes and our concerns. Then, we strategically marked out the locations in the steel beams to be fabricated with 5″ holes and 3″ holes as per the structural engineer’s recommendations. It’s always a good idea to place some smaller holes in the steel beams for wires and water lines to pass through if needed.

Rough in Plumbing

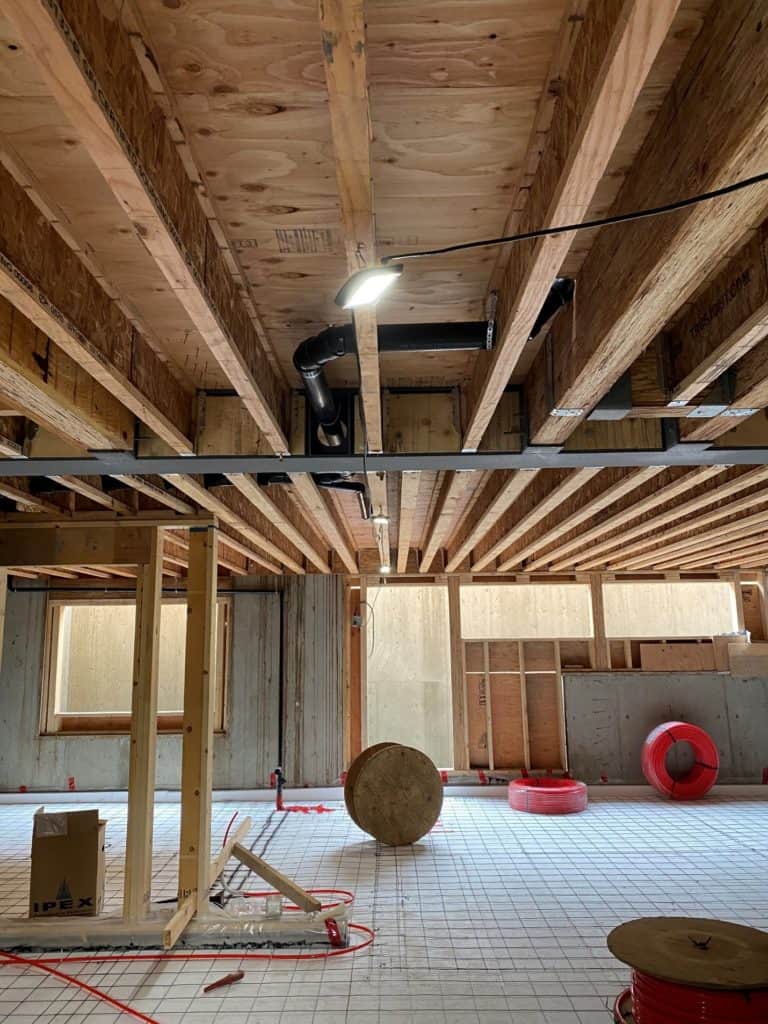
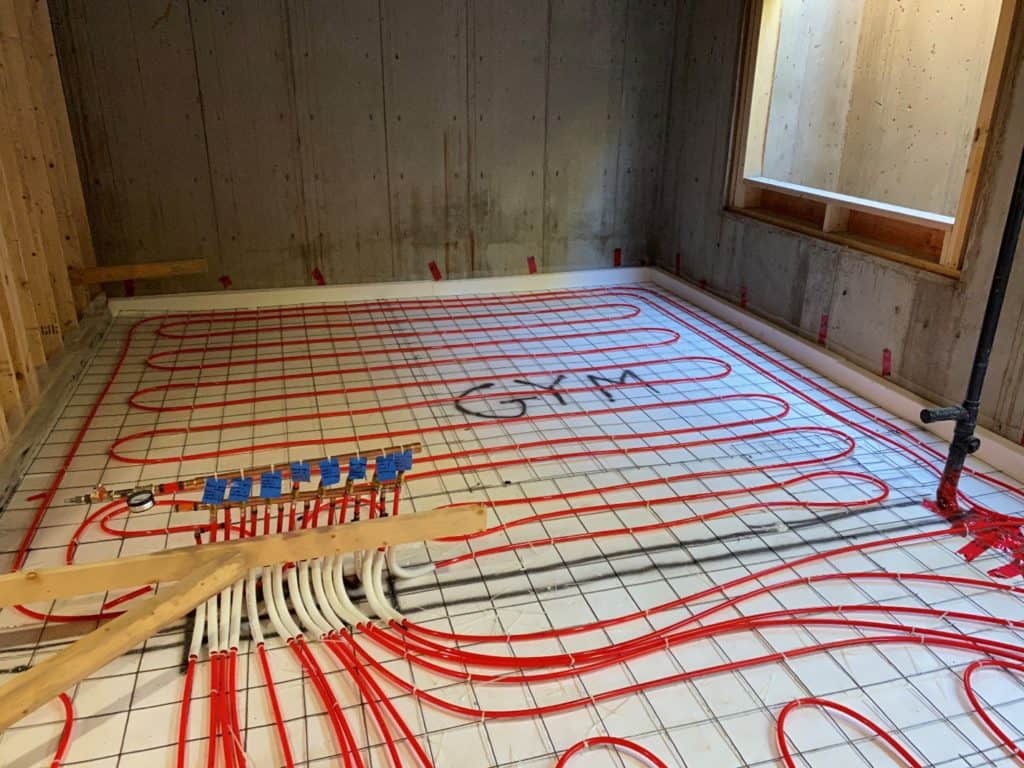
After the DWV has been completed and the inspection has passed. Then, depending on the type of heating, you’re going to want to complete your slab prep so that the plumbers can carry on with the in-floor radiant heating.

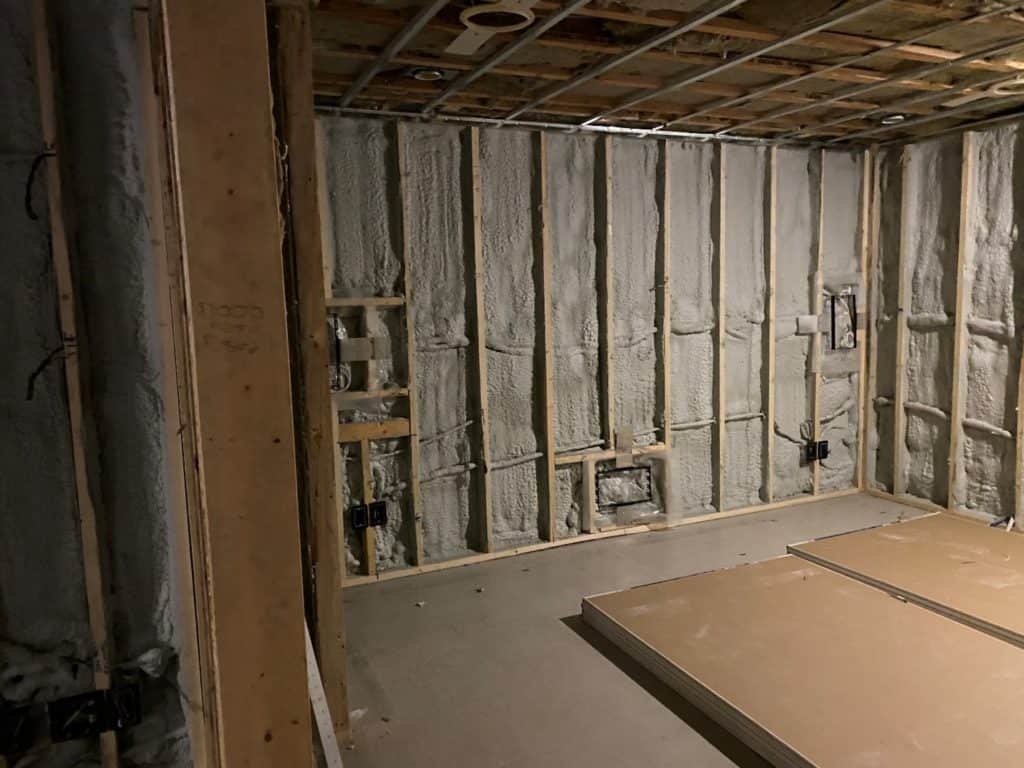
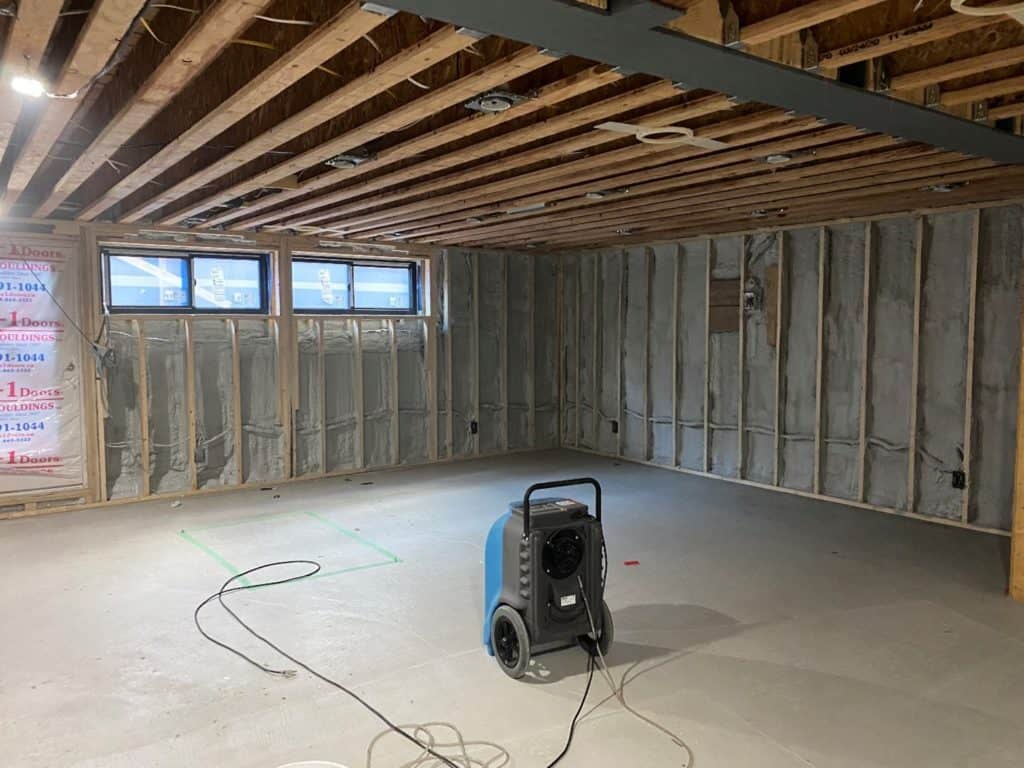
Most of our homes are in-floor radiant heat, and therefore, our process looks like this. First, we’ll level out the gravel to the proper elevation required, install a vapour barrier sealed with acoustic sealant at the edges, install the specified under-slab foam (insulation), followed by welded wire mesh for reinforcement.

After the slab prep has been inspected, you can install your in-floor radiant heating on all three floors. Again, make sure you discuss the different zones for each home area to control the heating from every room or section of the house that you choose separately.

floor radiant heating

After the heating is complete, you’ll want to pour the concrete slab for the basement and the radiant topping for the two floors above. Make sure you block out crucial areas where you don’t want concrete, for example, under the kitchen Island if your electrician still needs to feed a wire or two. Fill any holes in the plywood and plates, so the concrete doesn’t find its way through them, and make sure you don’t have any leaks in your roof if it rains during the pour.

Book your concrete and place the concrete! The next step is quite exciting once the concrete cures the next day and you can walk on your new freshly poured concrete. Finally, your house will start looking and feeling more like a house.

Play Video

Next, it’s time to do the back framing in the basement and wrap up any other framing throughout the home. Now is the time to frame your closets, fireplace framing, interior walls, finalize any door and window sizes, attic access and anything else that needs to be completed in the framing stage. Finally, we install our window prep to be ready for the windows when they arrive to be installed.

Rough-in Electrical, HVAC & Plumbing

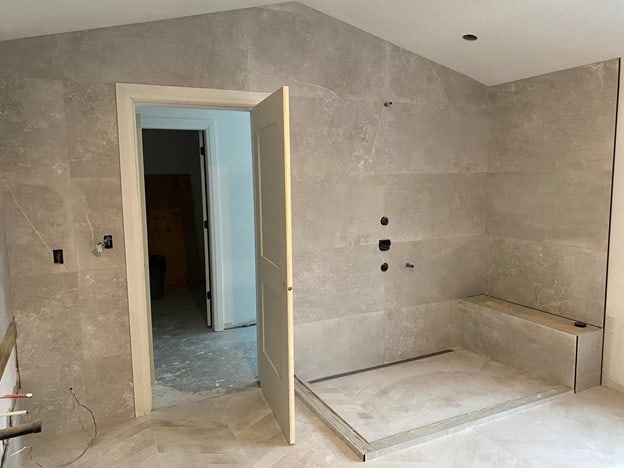
Now it’s time to run the water lines and install the plumbing fixtures for the house. Next, the bathtubs get installed, shower components get installed in the wall, and the shower pans/bases get installed and waterproofed at this point. 

Remember, if you have any bathtubs or showers on exterior walls, insulate the walls before installing the shower/bathtub. Suppose you install soap niches for your showers to mark and install the proper spacing required so that the tile setter can install the soap niche. 

It’s essential to mark out the locations for the plumbing fixtures and take photos for your records, and it will come in handy throughout the project. 

We will show the cabinet installer and other trades to see the rough-in lines after installing the drywall. Another great idea is a 3D scan of the home during the rough-in stage to capture all the images. It’s always great to have these photos so that you can look behind the walls in the future without having to guess what’s there. 

Tip: Install wooden backing for grab bars, towel rings/bars, shower glass and anything else that requires solid support so that you don’t have to use drywall anchors at the finish stage. 

Next, install the gas lines in your home. Choose the location where the Gas meter will be installed on the body of the house outside. You will most likely install a gas line for a fireplace, range/cooktop, boiler, outdoor firepit/BBQ, and possibly a backup generator. 

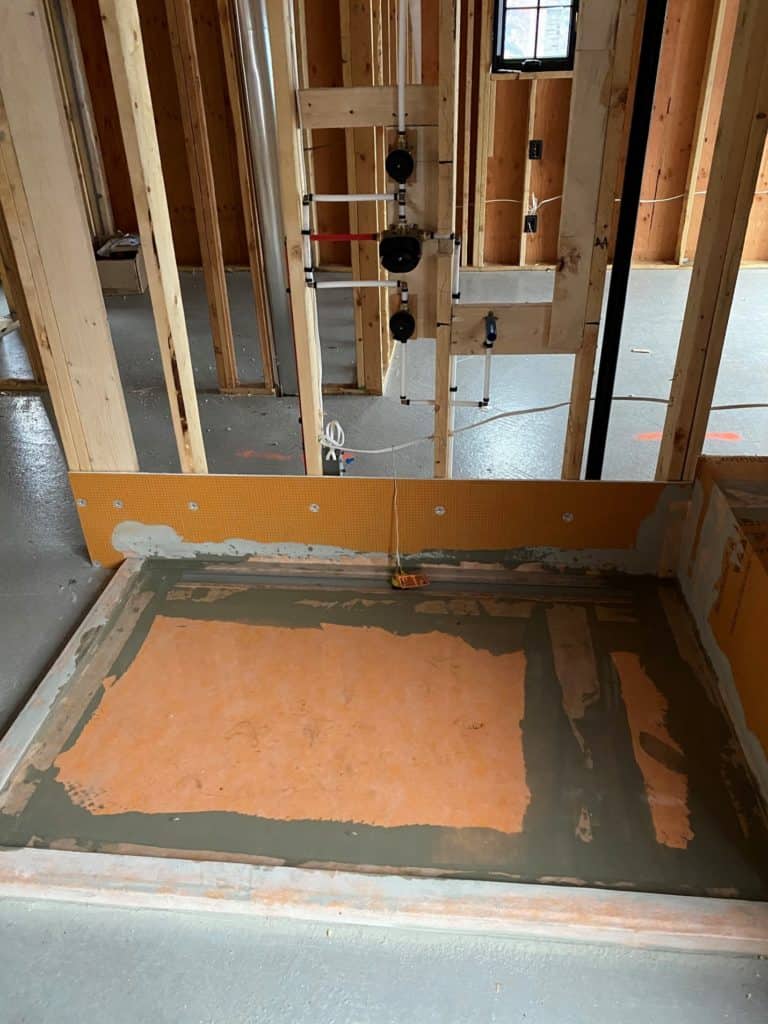
Powder Room: Wall hung toilet, wall-mounted faucet and sink rough-in. 

Rough in Electrical, HVAC & Plumbing

Primary En-suite: Schluter shower system and rough in shower fixtures.

Rough in Electrical, HVAC & Plumbing

Electrical Rough-in

After the rough-in Plumbing & Gas are complete, it’s time to start the Electrical. First, we start with installing the pot lights so that we can position them in the ceilings. These days it’s popular to have many LED pot lights. I think for our Marigold project, we had around 250-280 pot lights.

However, we continue with the switch and receptacle boxes after the pot lights and start the HVAC. The HVAC contractor will line up their diffusers with the spotlights so that everything looks clean and inline rather than turning the ceiling into Swiss cheese with holes everywhere! We like to install linear diffusers in our homes which are a more high-end and clean look. Others install round diffusers or 4″ x 10″ diffusers, but they don’t look as lovely for Goldcon homes!

During the electrical stage, the electrician will need to install all of the rough-in locations for the home. You will need to know the specifications for all appliances to install the correct amperage for each piece of equipment and the proper place. Is the dishwasher a plug-in or hardwire? With the garburator, will the unit be switched on by a counter switch or a wall switch? We take care of many small details during this process, and it’s at this stage where we need the inter design and the specifications to be final!

Electrical Rough in

HVAC Rough-in

The HVAC rough-in starts after the pot lights are installed. During the design stages, you’ll want to dedicate an area in the home for the HRV and the indoor AC unit. For example, in our homes, we typically have the HRV in one of the cabinets in the laundry room if the home has a laundry room on the upper floor. It’s easy to access, and we can run a drain line for the HRV unit to the washing machine drain line.

The indoor AC unit is typically installed in a storage space or closet on the upper floor. First, the HVAC contractor installs the AC unit and runs all the ducts to the locations required throughout the home. The HRV ducts are also run to the areas needed throughout the home. Next, the bathroom fans are installed and vented, the hood fan exhausts are run, and the dryer exhaust.

You will need to select an area outside of the home for the outdoor AC unit (make sure you position the unit within the required setbacks. If you have any questions about the location, you can ask your building inspector for clarification). After the HVAC is complete, the electrician will continue with completing the electrical and all the wiring. We typically wait for the windows and doors to be installed and get to the lock-up stage before wiring starts.

Exterior Windows & Doors

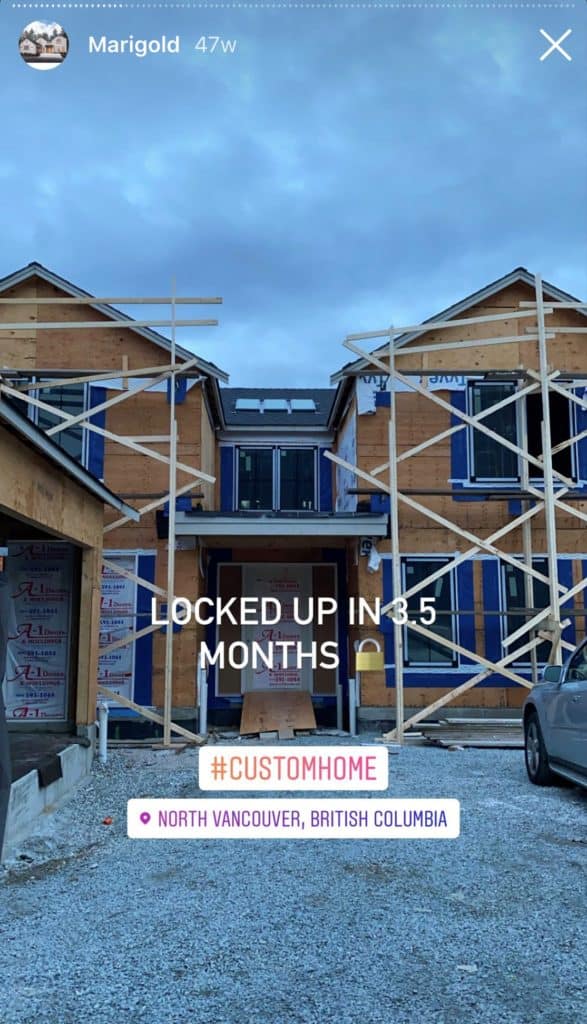
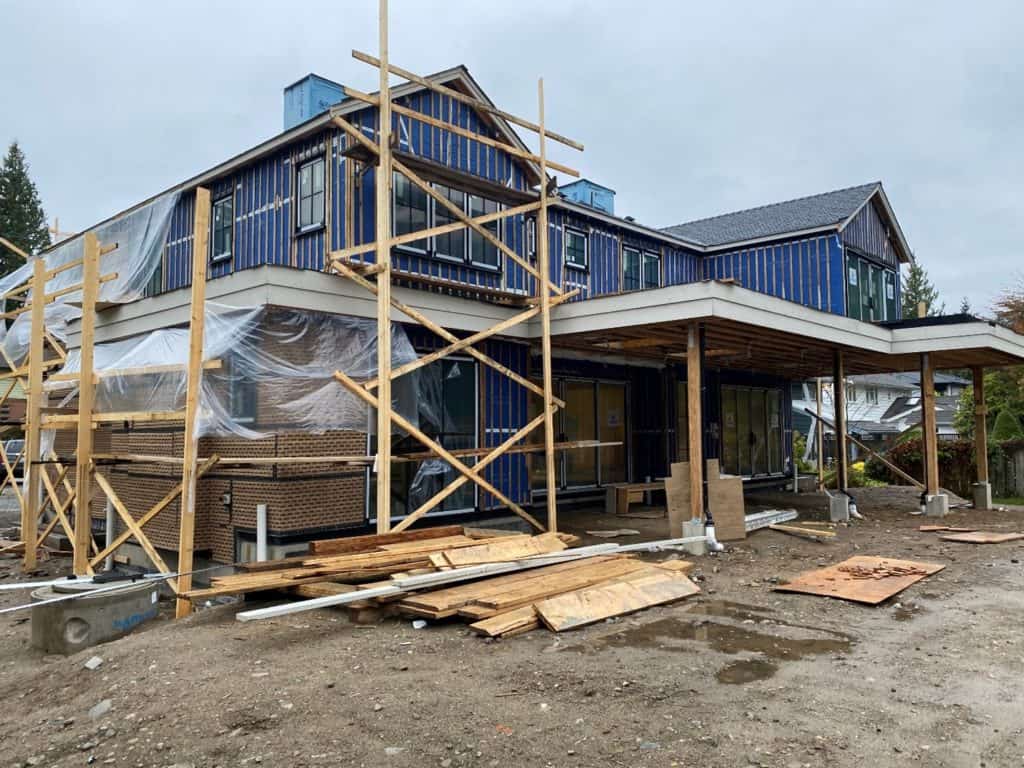
Now it’s time for the doors and windows to be installed and reach the lock upstage. The lock-up stage is quite an important milestone for a construction project. The roof, doors/windows have been completed, and the house can be locked. It’s a milestone in many construction contracts for the contractor to get paid, and it’s also a big deal for financing if you are getting a construction loan from the bank. 

For Marigold, we reached this stage in three and half months from demolition to lock up. However, before the doors/windows can be installed, they must be prepped by the framers or window installers. We decided to use SIGA, a high-performance house wrap, rather than the traditional Tyvek building paper. Here is a photo of the window prep completed before our window installation. 

Exterior Windows & Doors

The windows and doors are installed. At this stage, referred to as “Lock Up,” you will want to phone and schedule the natural gas to be planned and installed, which takes about 4-6 weeks. Once the gas is installed, the boiler should be installed, and the heat can be turned on after the drywall stage and before the flooring is installed. 

Exterior Windows & Doors

Low Voltage & Home Automation

Low voltage and home automation are next once the house is locked up and the electrician has completed the electrical wiring. This is essentially the brain of the home when building a smart home. 

First, you will want to select an area of the home where the Control4 rack and all equipment will be placed. For Marigold, 90% of the lighting was controlled by Control4. We installed security cameras, a home theatre, ceiling speakers, recessed tv boxes, Nest thermostats & a central vacuum which is all part of the home automation package. You can arm/disarm the security and control your audio, lighting, and heat/ac remotely with a simple app on your smartphone. You can watch the security footage from your smartphone live and also answer the doorbell by video call. Here is a before and after photo of the home theatre at Marigold.

before and after photo of the home theatre

Insulation & Mid Blower Test

After all the trade inspections are complete, you will need to call for a structural engineering inspection followed by a building inspection for framing before insulation. 

It is good to bring a dehumidifier to the site and let it run for a few days to extract any unwanted moisture from the home before the insulation and drywall are installed. You should check the moisture level in the home, and it should be around 12%-15%. This is your final chance to review the locations of the rough-ins and take any pictures from behind the walls/ceilings before the insulation gets installed. 

In many of our homes, we will spray foam the attic/roof and the basement walls. In addition, we will use Roxul sound insulation for essential areas of the house—for example, the theatre room or basement suites. 

After the insulation has been installed, we will install a vapour barrier on the inside of the exterior walls with a sealant along the seam. Once the insulation and vapour barrier is installed, we will schedule a mid-blower test, and you can read more about this test here. The mid-blower test is done after the insulation step and before the drywall is installed. The point of the test is to check for any air leaks throughout the home and patch the penetrations if there are any gaps and leaks. 

Our goal with the new energy step code is to create as air-tight a home as possible. Once the blower test is complete and the inspections are passed, it’s time to drywall!

Insulation & Mid Blower Test

Drywall

Drywall

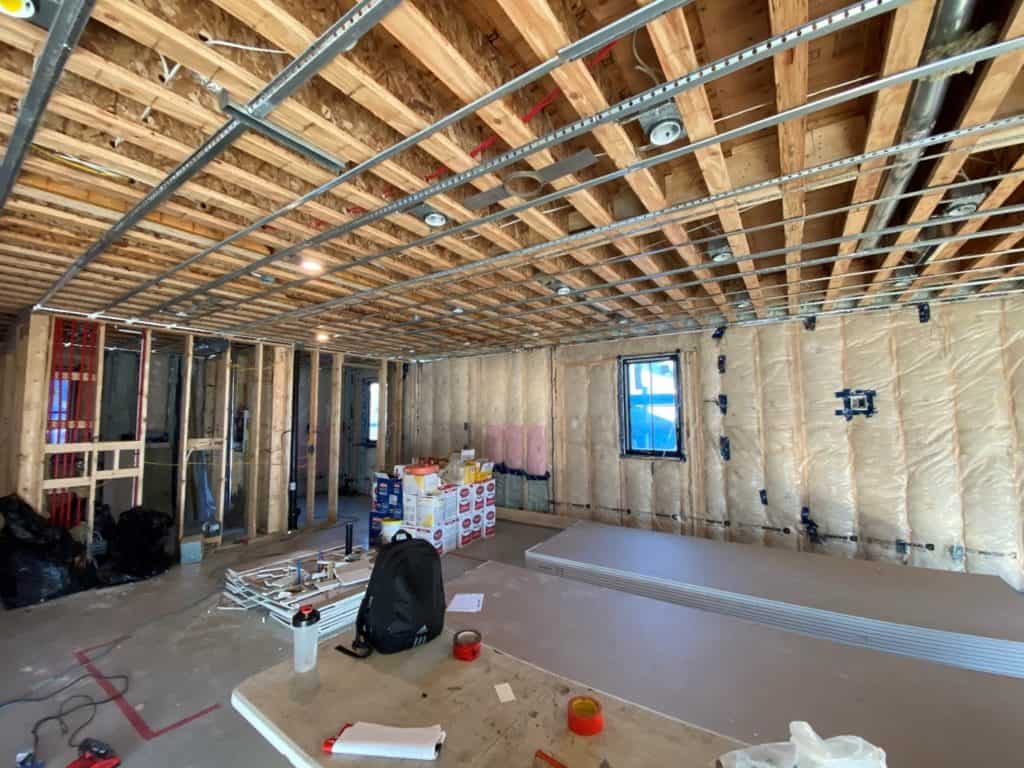
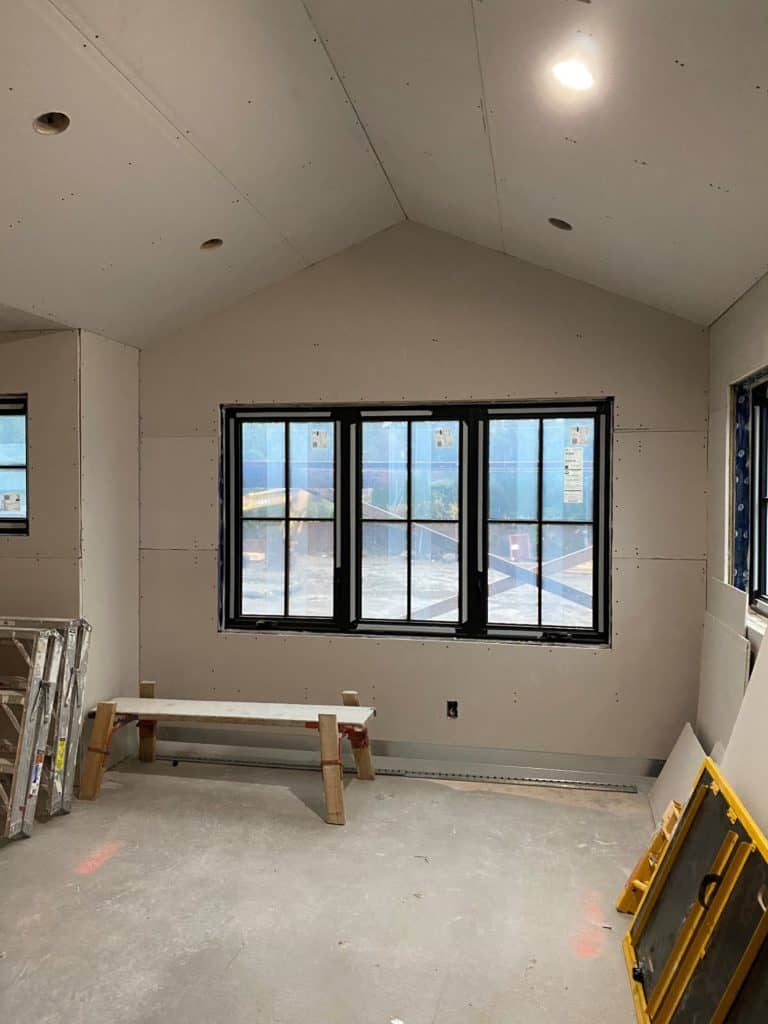
The next step is to drywall the home, and this can be pretty exciting as you will now start to see some walls in your home. Again, it’s crucial to select a qualified drywall company to do the work.

You might ask what the metal bars are on the ceiling; those are resilient channels and angle bars. It is a construction technique from one of the drywall contractors we hire for almost all of our custom homes. Essentially, the corners of the walls and ceilings are lasered level while the center of the ceiling is floating on the metal bars. Floor joists and roof trusses are never 100% level, so this method creates a flat/level ceiling without any waves or humps.

Drywall

The drywall is delivered to the site, and the board is installed. Next, if you are at the drywall stage in the fall, you will want to supply some heat so that the tape/mud can dry promptly. We will provide electric heaters and fans to ensure adequate heat and air circulation to dry the mud. This stage takes about 2-3 weeks, with roughly three coats of mud and sanding in-between.

Play Video about Drywall
installed drywall

Painting (Part 1)

Once the drywall is complete, the entire home should be vacuumed and swept clean to ensure no drywall dust remains. All the scraps of drywall should be removed from the house as well. Next, the painter will apply a primer/drywall sealer to all the new drywall installed. At this stage, some builders will paint the ceilings and apply one coat of paint to the walls; however, after a few years of building, we realized that a lot of repainting occurs due to trade damage. Therefore, we only ask the painters to apply primer then we are ready for the next steps, which are finishing.

Exterior House Wrap & Cladding

I’ve focused more on the interior of the home. However, the exterior is just as important. If you see the photo of the drywall delivery above, you will notice that the house is wrapped with the rainscreen strapping attached. The house wrap can occur as soon as the sheathing inspection has passed, generally around the rough-in stage.

Exterior House Wrap & Cladding

The exterior of this home is stucco with stone accents, and the soffits are pine/cedar. You will want to complete the soffit installation before the stucco can start.

Exterior House Wrap & Cladding

Ensure all pot lights, heater wires, camera wires, speakers, and other items are correctly roughed in and not missed when the soffit installation takes place!

The stucco process is a three-coat process. First, the metal lath is installed on the exterior walls, and then the scratch coat gets applied, then the brown coat and then you finish with the final colour coat. The weather must cooperate for these applications as you don’t want to use the coats when the temperature is below four degrees Celsius.

Interior Finishing Stage

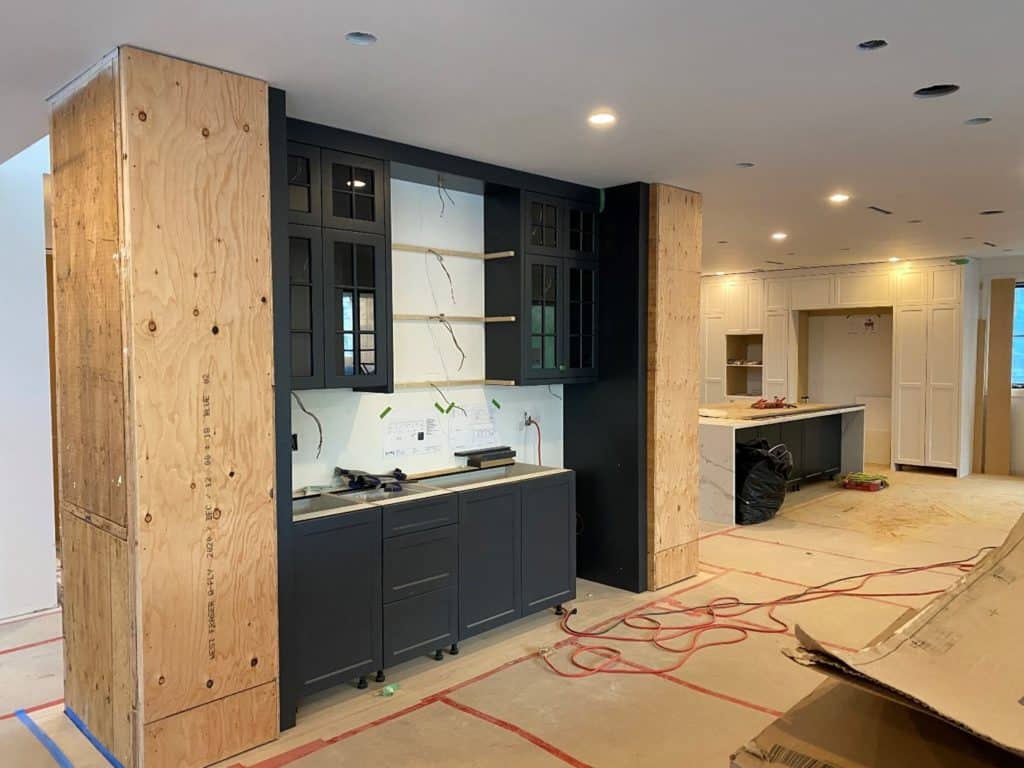
After the interior walls and ceilings have been primed, the interior doors and mouldings will be delivered to the site. At this stage, we will install all of the interior doors and the window liners, window and door casings and the baseboards for the carpeted bedrooms. We will also install any decorative wall mouldings such as shiplap or crown mouldings.

Interior Finishing Stage

At this stage, we are also starting the tile prep, waterproofing and tile installation. It’s essential to check the floors and walls to ensure they are level and plumb. If any floor grinding or levelling is required, it should be done now to ensure a proper installation and finish. This stage typically takes a couple of weeks, depending on the size of the home.

Flooring

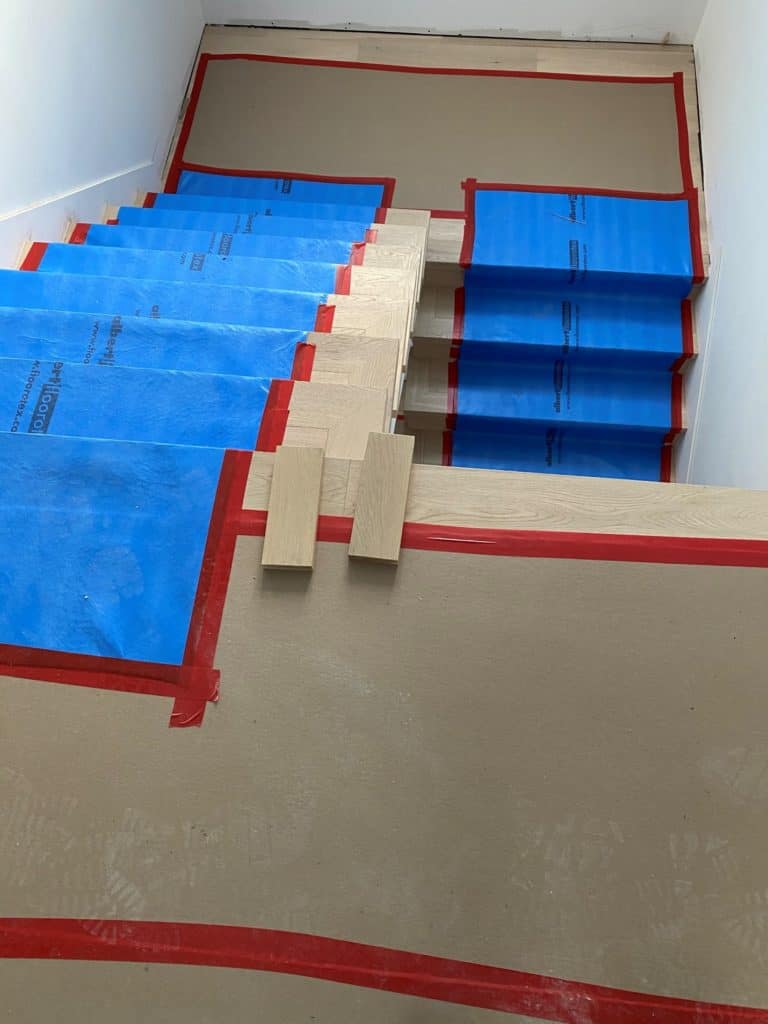
Next, the flooring is delivered to the site a few days earlier than the flooring installation for the hardwood to acclimatize. We installed an engineered hardwood product as the flooring choice, which seems to be quite popular today. The installation method is a glue-down install which is a far superior install method to a floating floor.

Flooring

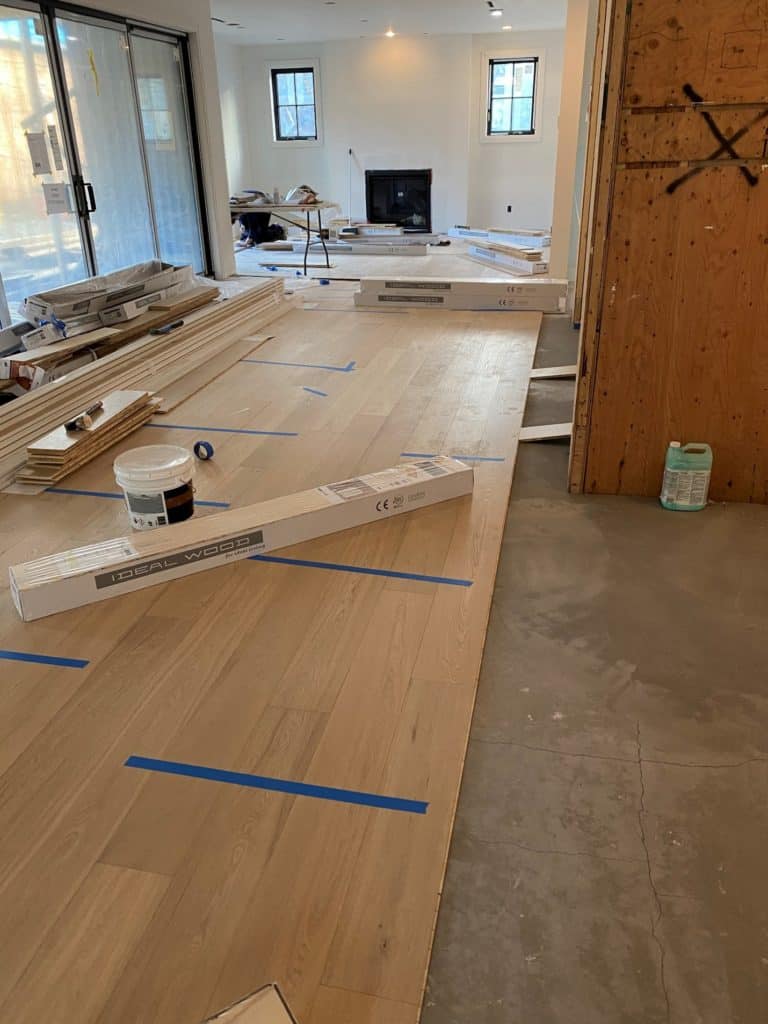
If you want a solid floor, definitely ask the flooring installer to do a glue-down installation. Before the installer installs the hardwood, make sure to check the floors for any imperfections. Almost every floor installation requires good floor preparation for a perfect finish. This can include grinding, patching and levelling before the floor installation. The flooring stage could take 2-3 weeks, depending on the size of the home. Once the flooring is complete, you’ll want to clean the floors and protect them right away with a floor protector. The same goes for the stairs.

Stair Flooring

Cabinet Installation

The floors are installed and protected. Now it’s time for the cabinetry to be delivered to the site and installed. Again, remember the rough in photos, and it’s time to share them with the cabinet installers to prevent any screws from hitting wires/pipes.

Have a meeting and go around the home to discuss the cabinetry install and anything that needs to be addressed as this is a big part of the home’s finish. Once the cabinet boxes are installed, you can ask the countertop installer to measure for the counters. It’s wise to measure the required countertop slabs and put them on hold well before this stage if there are any stock problems.

Cabinet Installation

Continue With Finishing Interior & Exterior

Depending on the weather and time of the year, you could start your landscaping which could take 4-8 weeks depending on the size of the property and the complexity of the project. In a perfect world, the goal is to finish the interior and the exterior simultaneously, so it would be good to start the landscaping as soon as possible.

Painting (Part 2)

Then it’s time to hand over the interior of the home to the painting contractor for 3-4 weeks, depending on the size of the home, to finish the painting without any other trades going in and out of the home. First, the painters will completely mask everything and start with prepping the doors and mouldings. Next, they will fill, caulk and sand the trims, then apply 2-3 coats of paint with a sprayer for a perfect finish. Once the trims are complete, the ceilings are then painted, followed by the walls.

Finish Fireplace & Surround

The fireplace surround can be installed as well as the fireplace finishing. The fireplace installer will come back and finish the fireplace and make sure everything is working just fine.

Finish Plumbing

We like to start with the plumbing first, but there is no natural order for the finishing. The plumbers will install all of the sinks, faucets, shower components, toilets, and other fixtures installed in the home, followed by a final plumbing inspection.

Finish Electrical

The electrician will install all of the pot lights, wall receptacles/switches, and electrical fixtures. The electrical panels will be completed and neatly labelled. An electrical inspection will be completed as well.

Finish Electrical

Finish HVAC

The HRV unit is installed as well as the AC unit and all of the components.

Finish Low Voltage

All home automation equipment will be installed; it’s a good idea to book the internet installation before the low voltage contractor shows up to the site to arm the home and ensure all components are working correctly.

  • Install Closets
  • Install Railings & Glass
  • Install Carpet

The closets, railings, glass, carpet, and accessories can all be installed at this point. This would include all door handles, door stops, bathroom mirrors, bathroom accessories such as towel rings, towel bars, and any other supplement installed.

Install Garage Door

You’ll want to book the delivery and installation of appliances towards the end of the project, as it is one of the last tasks before completion. We often reserve the post-construction cleaners to visit the site and start cleaning in the areas that they can as there are odds and ends near the end of the project and would take too long if we wait until everything is complete.

They will do the bulk of the cleaning, and once everything is fully complete, the cleaners will do a final clean of the project. During this time, the landscaping is being wrapped up, and we are getting all of the final inspections preparing for the occupancy permit and completion of the project.

Once the occupancy permit or completion certificate is issued, the project is complete, and the new homeowners can move in! If the house is for sale, the stagers can start staging the home, listed right away. Every construction project has a deficiency list or punch list. As some call it, this is a list of items that need to be fixed. An example would be paint touch-ups, floor scratch or grout touch-ups. These minor deficiencies are often taken care of before the new homeowners move into the home.

The home is now complete and is registered with the home warranty provider, and the 2-5-10 warranty starts now.

More to explorer

Maintenance Tips For Your Home

Maintenance Tips For Your Home

If you live in Vancouver, then you know one thing for certain – it rains a lot! This means that homeowners in

Scroll to Top